Many Icemen never see the lighter bites. As the Winter gets later, snow gets deeper, ice gets thicker, and light is less, beneath the ice, you need to adjust your rod tips to see the bites.
Homemade Tip Strike Indicators are easy to make and attach to the rod. You can buy commercial styles that are flat bladed and have clip on attachments. They come in different lengths, stiffness, and attachment styles. Some light bite styles look like springs. Others include bells.
I have found that making your own rod tip indicators is easy, cheap, and effective.
Making a wire strike indicator
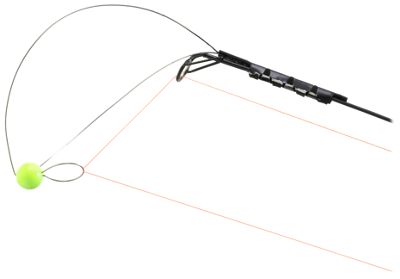
Materials to make an indicator. I build my indicators using Spring Wire. You can get these strands at a good hardware store. They come in thinner or thicker diameters. I have also use the thin wire found on yard flags. These are often used for marking powerlines or other below ground items or boundaries. They also can be found in different diameters. I then add a Styrofoam ball to enhance visibility.
How to Attach the indicators You can use electric tape, shrink tubing, or Lexel, (a silicon adhesive/sealer). Slide the Styrofoam balls over the wire and push up to the round tip. Bend the indicator wire just behind the ball.
Taking off your rod tip to use shrink tubing, you need to remove the rod tip. Use a lighter to slowly heat the tip top guide, not the rod blank. I use a pair of forceps to pull the tip from the blank. Clean the tip, slide on the shrink tubing, and place some hot tip top glue on the blank. Slide on the tip and align with the other guides. If you heat the rod blank too much, it will melt off. Now slide in the indicator wire adjust, and slowly use the lighter to shrink/heat the tube.
Length of the indicator the longer the indicator/wire, the more sensitive it will be. My indicators are around 4-6 inches beyond the rod tip.
Best colors of indicators Human eyes can quickly see pink and chartreuse. On the ice, Chartreuse is my color choice for the indicator Styrofoam ball or cylinder. You can also tip the top indicator wire in paint to add color.
Avoiding sharp ends/ tangles Use a file to smooth any sharp wire ends. Monitor the line coming off the rod tip to ensure there are no loops. If the indicator gets bent, simply straighten.
When tips ice up Make the hole of the indicator at least ½ inch in diameter. This will prevent ice from loading up. You can get rod tip tops that also are larger in diameter. If you are using a standard rod tip, coat it with some ChapStick to minimize freezing. It the tip still freezes up, put it into your mouth and allow the warmth and saliva to melt and prevent ice.
Remove at the end of the season You can leave the indicators in place on dedicated ice rods. If you are adding the indicators to your wet season rods, remove and store until next year.
Lighter tips mean easier to see bites!
Montana Grant
Join Montana Grants Facebook Group at Montana Fishing For Fun!


